|
You are reading the older HTML site
Positive Feedback ISSUE
16
Building a Reference Grade Listening Room All photographs by Mike Lavigne; image processing by Robinson
So what possessed you to build a dedicated room? Back in 1994 I got into this hobby on a serious level. I had always enjoyed music and back in High School (the '60s) and College (early '70s) I had a 'Stereo System' that was semi-serious... at first a Wollensack reel to reel tape recorder (bedroom in parent's home), then AR speakers, Sansui receiver, and AR turntable (dorm room)... finally, Bose 901's, McIntosh, Dual turntable (own apartment). Then I got married and was a Bang & Olufsen guy for 15 years or so (boats, TV, kids, etc., were the priorities). The kids moved out, and I discovered the 'High End.' At first I had the gear in the family room (connected to the kitchen/eating space)... competing with the noise of the dishwasher, the kitchen sink, and 'life' in general. I kept eyeing a large den (a favorite room of my wife) where we had a desk and piano. One afternoon when my wife was gone, I moved all my gear into the den. All of a sudden, I had a dedicated room... which was to be my audio home for the next nine years. I got lucky with the den; it had a very high ceiling (almost 11 feet), a bay window and floor to ceiling bookshelves on the rear wall. Soon the desk and piano were evicted and I settled into audio bliss in MY room.
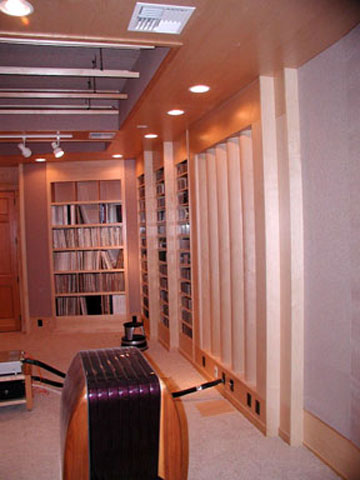
Old Room - front... only 12 feet wide. I won't get into all the gear I eventually went thru while in that room... but I touched a few bases... mostly Wilson, Levinson and Transparent... then... Rockport, Kharma and Tenor. I did spend considerable time trying to overcome the limitations of the 18 foot length and 12 foot width. As I came to the end of the road on system component performance I became increasingly aware of the limitations of the room has on ultimate system performance. Since my room was only 12 feet wide I had found that by over-damping the sidewalls I could still listen at moderately high levels…but there was still a closed in feeling... and the bass could get quite boomy on many cuts. It seemed that the room was limiting resolution and restricting the music from breaking loose.
Old Room - back wall The sound of my system was satisfying, but the knowledge that there was more got under my skin. In addition, I really enjoyed having fellow audiophiles visit me... I wanted a bigger room... at least 17 feet wide, 25 feet long and 11 feet tall... a concrete floor, and NO noise issues. These were my minimum parameters for a room to be worthy of my gear. I also wanted to be able to listen whenever I wanted without disturbing the sleep of my wife. How did you pick the place to build this room? For a year or so I considered adding a dedicated room onto my home... but after exploring the possibilities I determined that the cost and investment considerations in my neighborhood would not pencil. After discussing this on and off for 6 months with my wife; we decided to look around for another home that would either already include the space I needed or allow an easy addition. We spent another 6 months looking around... made 3 different offers on various homes... and finally found what both of us were looking for.
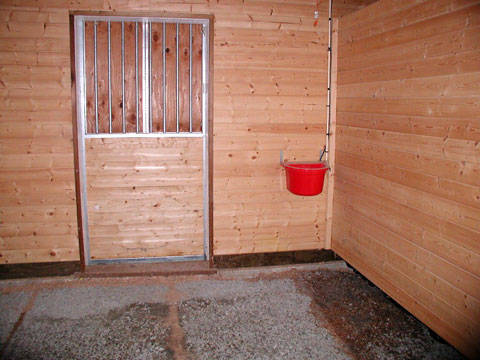
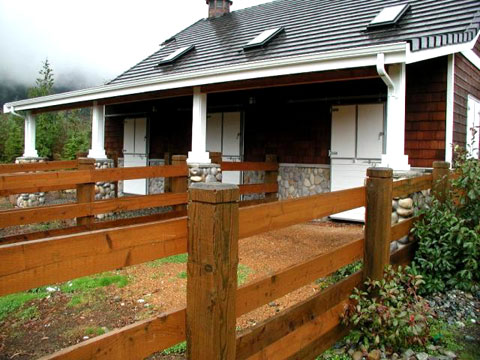
The Barn I found a home on 4 acres with a separate barn. This Barn had the potential of a completely unrestricted space, 37 feet long, 25 feet wide, and 11.6 feet tall. We proceeded and purchased the home, then move into it in January of 2004. The barn had been home to a couple of horses, a couple of Great Danes, and 3 or 4 barn cats.
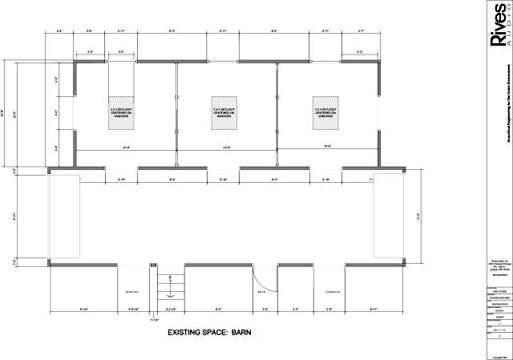
Middle stall of the barn So here I was with the potential space… what next? First, a little about my audio compass; my viewpoints and listening goals. I have always really enjoyed listening to new music... which was a problem, as I have never had much knowledge about music. So I would read reviews and buy a recording if the review described what I thought I would like. Some people are afraid to buy music, just in case they don't like it get stuck with it. I, on the other hand, am afraid that if I don't buy an unfamiliar recording, I might be missing something. Over the last 10 years I have bought lots of new music... what is interesting is that music that I bought and didn't connect with initially, many times became a favorite later, as my musical tastes and knowledge matured. I grew to love Jazz, and now I am progressing on my enjoyment of classical. My purchasing philosophies have resulted in a fairly large music collection... which I like to have in the listening room with me... as much as possible. I have evolved in my philosophies regarding what gear I like and how I want things to sound. Initially, I read reviews and listened... then I would buy. As I went through a few years of upgrading along the Levinson/Wilson path... I developed listening skills and appreciation for a more refined sound... I evolved from focusing on parts of the music (the sounds) to wanting to have as little between me and the event (the music) as possible. I was attracted to gear that had as little of its own sound as possible. As I found gear that fulfilled my particular tastes, it was clear that at a certain point the room became a barrier to the system 'getting out of the way' of the musical event. I want a system with no part that draws attention to itself and away from the musical message. Great deep bass is fine if it is not 'prominent'... it must serve the music, and not vice versa. This is what defined my communications to my room designer. How did you pick your room designer? I had met Richard Bird and Chris Huston of Rives Audio back at the 2003 CES. I had become quite interested in room acoustics while trying to tame my previous room. A few of my friends had had great results from Rives' approach to room design. Rives Audio believes that many rooms ended up over-damped, and that diffusion was a better method of 2-channel design. The whole 'live-end/dead-end' approach was inadvisable in all but the smallest rooms, as it robbed the music of its energy. This made sense to me. Richard was out in the Seattle area in March, so I picked him up at his hotel and had him over to my home for a short visit. At that time I was actually considering putting my listening room in the main house in a guest bedroom (I wanted my wife to be more involved). I eventually went back to the barn concept as I feared I would screw up the feeling of the house with an expansion, and my costs would yield no added value to the home. Redoing the barn would add finished square feet to the property, and would yield a return in that neighborhood if I sold. In any case, I liked how Richard communicated, and his concepts made sense. In April I contacted Richard and discussed my thoughts on the barn. He was excited at the potential of a separate building with virtually no design limitations... which in turn got me more excited. I sent Richard blueprints, and then measured all the distances on the plans so we would have accurate info for Rives to use. I gave Richard no limitations on his design within the 37' x 25' x 11.6' space. He came up with approximately 30' x 21' x 11' as a starting point.
Front of Barn prior to construction How did the design phase play out? Over the next 3 weeks we went back and forth with various ideas. I wanted a good deal of my software in the room, so it was important to incorporate shelves into the acoustics. I like my source gear on the side wall next to my listening position... I wanted a couple of small windows... I wanted the ceiling to be special. My concept had been to have a ceiling that started low behind the speakers and increased in height as it went back... Richard explained that there were a few problems with that approach, due to pressure zones. Finally Richard did a rough draft that I liked. The basic inside framed dimensions of this original concept were 29 feet long, 21 feet wide and 11 feet high.
Barn floor plan prior to construction
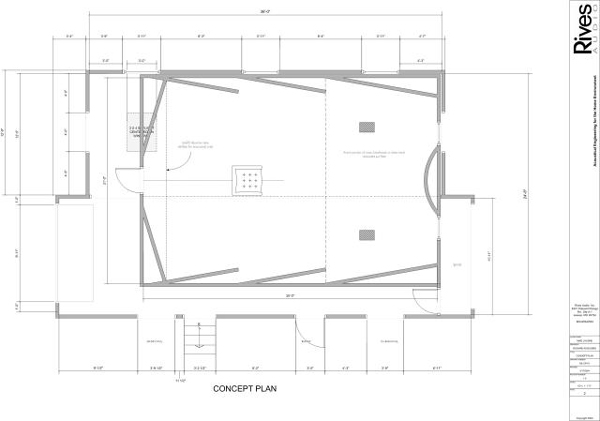
First concept My next step was taking this rough draft to my contractor for an estimate of what this might cost. There were structural issues that needed resolving. Until my contractor knew the approximate room size he could not get the engineering on the structural done. The three stalls of the barn would need to be torn out, and the central wall running length-wise thru the barn would need to be removed and spanned. Richard's concept called for a 42" wide hallway running down one side of the room so my contractor had the engineer design 2 main beams (16" x 4" gluelam) to run horizontally at the 1/3rd and 2/3rd points of the room, as well as a longitudinal beam connecting to the horizontal beams that would pick up the load from the previous long wall. This was kind of major, but resulted in a very stout structure. The hayloft above was already on 12" x 2" joists on 12" centers... this same design was carried across the rest of the ceiling. I wanted to have a pool table in the hayloft (as well as future LP storage), so the ceiling needed to be very strong. My contractor then actually began the demolition and structural investigation... prior to figuring how the structural beams would work. When the final structural issues were settled, Richard had Chris Huston get involved to do the detailed construction drawings. I might recommend reading Chris's bio at http://www.rivesaudio.com/files/Huston_bio.pdf to understand his credentials. He has possibly a unique background in music, the production of music, pro studio design, acoustical theory, and 2-channel room design. He isn't guessing about how things will sound with my money... he knows from science and experience. Every acoustical component in my room has already been used by Chris in other projects. Like many audiophiles with a little knowledge and experience... part of me felt I could figure this out. There are other acoustical design products/services out there to choose from... but the closer I looked, the more it appeared to me that other approaches were actually the application of tweaks to existing spaces, whereas Rives was fundamental in its stance and had more actual room design experience. Rives can 'band-aid' a room... but it is not their first choice. Chris took about 10 days to complete the first draft of the construction drawings for me to review. He e-mailed and sent me a hard copy of the plans... as I looked them over I got pretty excited... here was what I had been looking for. I ended up building pretty much exactly what that first draft showed. When Richard and I had gone over concepts we had figured a few things out.
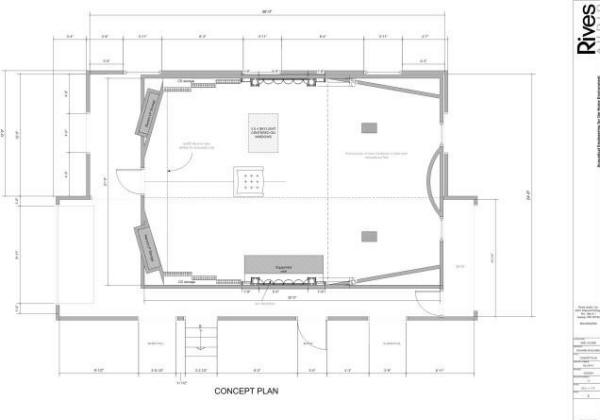
LAST Concept, pretty close to what we built The above concept plan is where Richard and I had taken things. Chris took this and went to the next level.
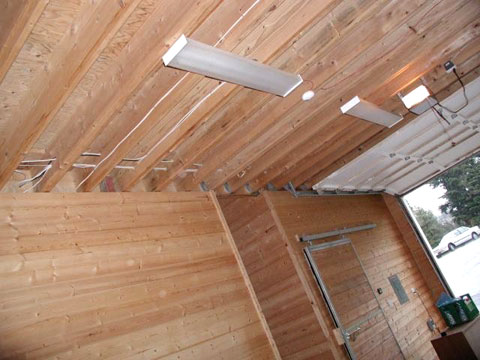
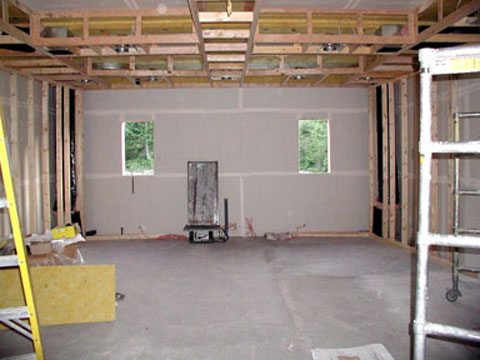
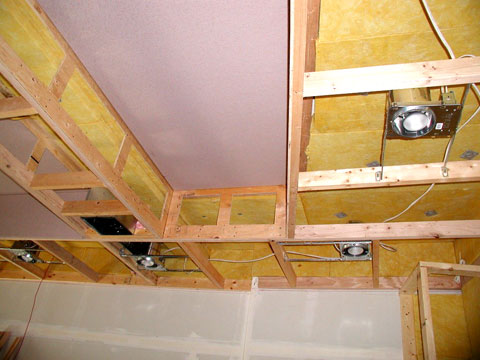
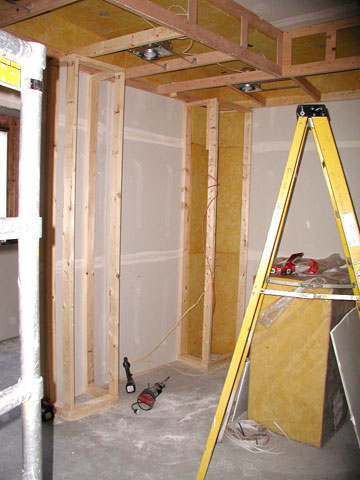
The horse trailer aisle and ceiling prior to construction The existing ceiling was 12" x 2" joists on 12" centers. It had been constructed to be a hay loft, so it was very substantial. A new ceiling was added above what had been the horse stalls to match the existing one. All the electrical for lights and power were installed... then R-39 insulation was stuffed into the gaps between the joists in the ceiling. R-19 insulation was installed in all the walls, which were constructed of 2" x 6" studs on 8" centers. There were 6 large posts holding up the large beams; these posts became part of the walls. In all, a very stout structure. Chris specified a sandwich of 5/8" sheetrock, 1/2" soundboard, and 5/8" sheetrock on the walls and ceiling for the whole room. Everything would be built inside this cocoon. Half the floor was already 6" of concrete over 6" of gravel. We extended this to the whole floor. Since this was a separate structure from the main house, sound isolation was not particularly critical. In addition, since this would be a pretty large space, the walls needed to be very solid to 'hold' the bass energy... in a relatively small room you might typically 'soften' the walls to keep the bass from getting too boomy.
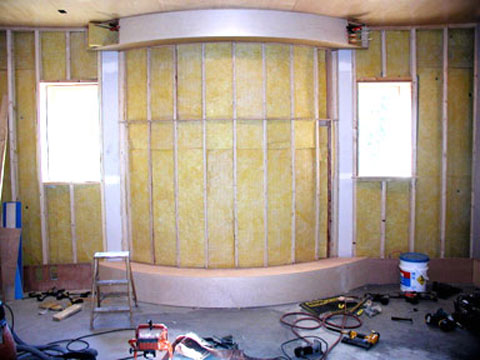
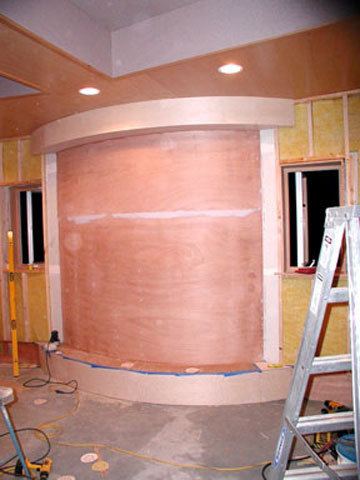
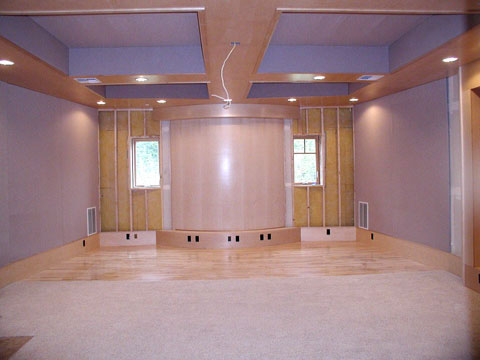
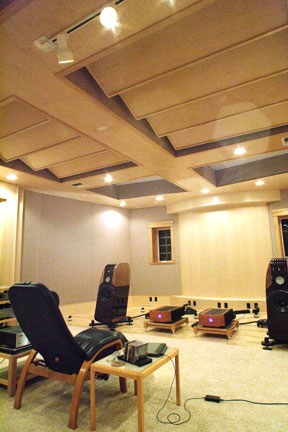
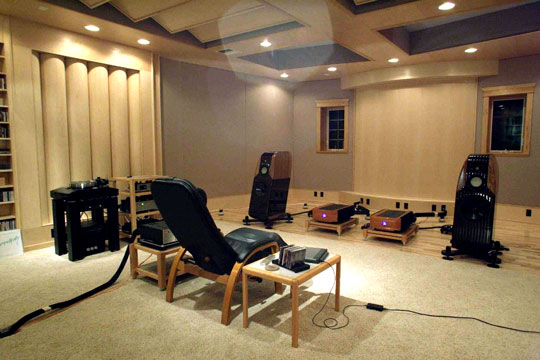
New room with sheetrock, speaker end The focus of the room and most unusual feature is the large center diffuser panel in the front of the room. This curved panel protrudes about 18" into the room at the center point. It is constructed of ¼" plywood over a stud wall and lined on the inside and back wall with 2" fiberglass. This plywood is then covered in maple veneer. Above and below of the diffuser panel are 12" soffits that follow the same curvature. This diffuser captures all the energy of the room but won't beam any first reflections. The adjacent fabric covered bass baffles create a perfect balance of absorption and diffuse reflection... retaining phenomenal soundstage layering and detail, while eliminating any smearing of detail.
Front Diffuser, without ¼" plywood…
…and with ¼" plywood
Side diffuser showing side relief Next, he took the front tapered side walls and made them a huge bass trap on each side. He lined the cocoon wall corners with 2" fiberglass, pulled the false wall corner out about 18", and then tapered the front wall too (so it tapers to the corners of the large center diffuser). The final drawings show a false wall of fabric-covered 1" fiberglass. This creates a huge (it extends about 10 feet down the side wall and 5 feet into the front wall and is floor to ceiling) bass trap (and absorptive surface) on the front side walls and sides of the front walls; it also eliminates the 90 degree corner. The size of this bass trap is much larger than any tube trap and is built into the room.
Front corner bass trap walls Chris added hardwood floor on the front 10 feet of the room, for added energy retention... a thick carpet and pad is specified for the floor on the rear 2/3rd of the room. The speakers will be positioned at the forward edge of the hardwood so their first floor reflections are off the carpet.
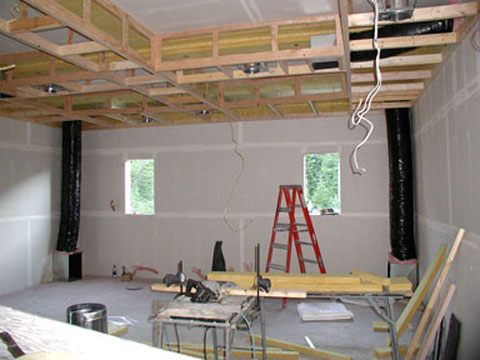
Carpet/maple hardwood floor On the ceiling, Chris designed a system of soffits and chambers. The soffits drop down from the 11 foot ceiling about 14" and serve as one large bass baffle. There are 6 chambers, three per side. The sides of these chambers have holes lined with fabric covered 1" fiberglass to allow the bass frequencies to enter and dissipate inside. The chambers break up any standing waves and eliminate first reflections off the ceiling. This whole soffit system is one very large bass trap.
Ceiling design, chambers and soffits As a final touch, Chris designed four 18" x 48" x ¼" hanging diffuser panels into the center two chambers to further reduce first reflections. These angled diffusers 'trap' direct sound from the speakers, but allow room energy to be retained.
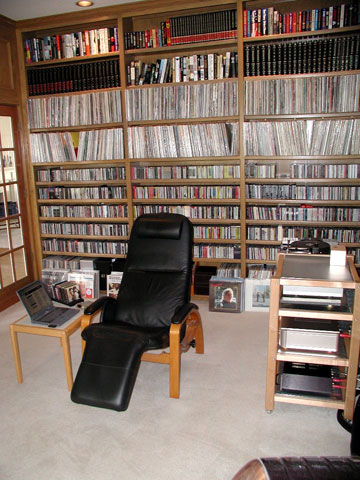
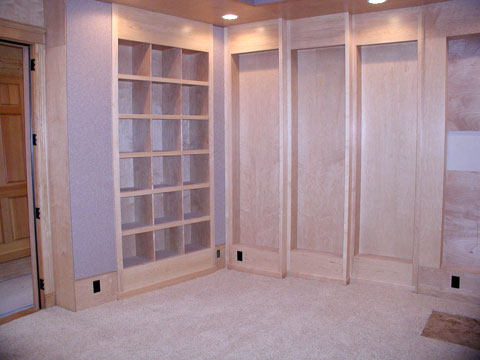
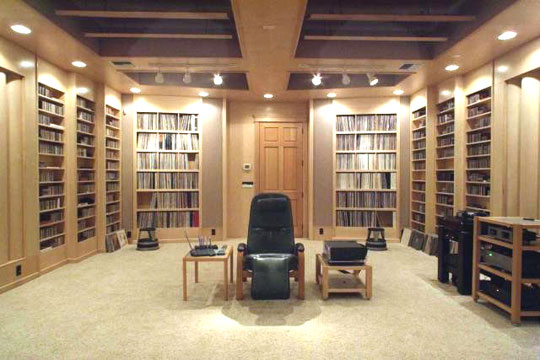
Ceiling diffuser panels The center of the side walls on each side contain vertical diffuser panels that Richard had specified in his concept above, and the rear side walls have floor to ceiling CD racks that will hold almost 5000 CDs or SACDs. These diffusers are semicircles of hardwood plywood filled with fiberglass. They diffuse any direct sound, but don't resonate. There are 3 sections of CD racks that step towards the center of the room and eliminate any parallel surfaces. The shelves with CDs are ideal diffusers. The rear wall has LP shelving that tapers toward the center on each side... holding almost 3000 LPs. In the rear corners and to the inside of the LP racks are floor-to-ceiling built-in bass traps... which are cavities lined with 2" fiberglass, with fabric-covered 1" fiberglass on their outside surface.
LP and CD/SACD shelves
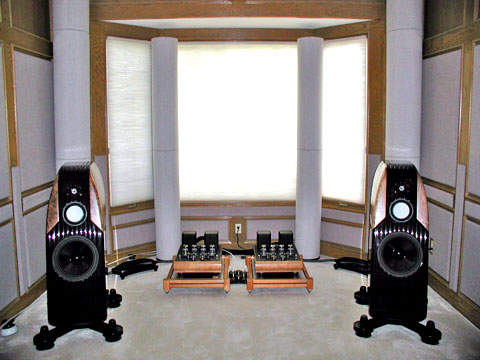
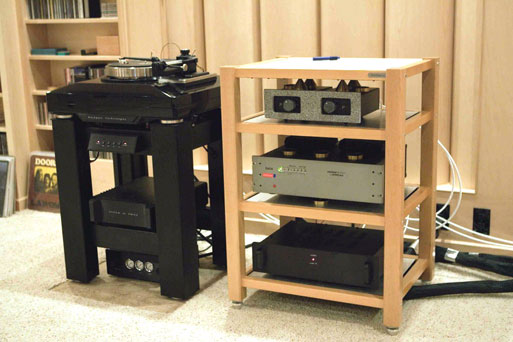
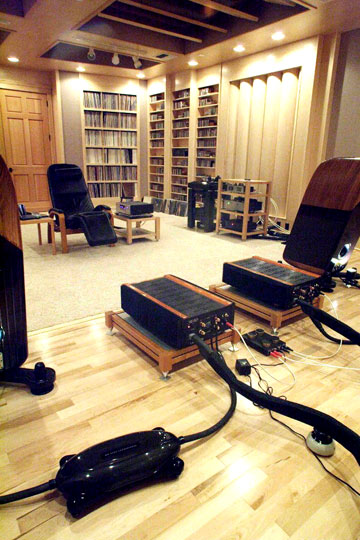
Rear corner bass traps The door is solid and uses weather stripping to keep noise and air from entering or leaving. I am a stickler for a door that is tight, looks good, and closes nicely. This door has a solid oak bottom jam and a 'trick' gasket that uses a cam mechanism to lower onto the jam when the door closes... neat. I like my sources to be on the side of the room, and the (monoblock) amps to be between the speakers. My turntable weighs 550 pounds; I have installed a 24" x 24" piece of Travertine tile directly on the concrete for the turntable on the left side of the room alongside the left hand diffuser panel. The air compressor for the turntable is in the attic above the room where it can't be heard. We installed 2" conduit for the turntable air and control hose in the wall. My digital source, passive switchbox, and phono stage will be located on a Zoethecus rack alongside the turntable, in front of the left diffuser. The amps and passive remote volume control are located between the speakers. There is a 7 meter balanced interconnect running from the passive switchbox on the left side to the passive remote volume control between the speakers. This interconnect is raised off the hardwood floor by ceramic cable elevators.
Sources and racks HVAC, lighting, electrical, and other system design HVAC (heating, ventilation, air conditioning) is designed into the room by Rives to be 'whisper-quiet.' It is dedicated to this room only, and has the fan/heat unit in the attic above the hallway outside the room. This unit is mounted on a vibration absorbent pad... even when standing directly under it in the outside hallway there is no noise or vibration. The air exchanger unit is mounted outside the Barn on the opposite side from the room, so when engaged there is no sound detectable from inside the room. This HVAC system is a closed loop... the main air duct emerges from the fan/heat unit and goes through an electronic air purifier, then is separated into four outlet ducts... each of which travel to four different outlet vents on the ceiling. Each of the four outlet ducts has three 90 degree bends to reduce any fan noise. With four outlet ducts the velocity can be reduced. There are two cold air return vents located at the bottom of the front bass traps (these cold air return ducts act as part of the bass trap). These cold air returns are then ducted back to the heat/fan unit. With the door closed and no music playing the room is completely quiet... not a sound... when the HVAC unit comes on you can just barely tell it is on... any music or conversation makes it impossible to hear the HVAC. I recently added a vent and cold air return in the upstairs rec room to reduce the air pressure/velocity in the listening room... this reduced the already very low noise about 80%, to just about nothing. Since I'm the only user of this upstairs room (except my kids when playing pool), I have no sound leakage issue with this. The problem with having a room with truly NO outside noise is that there is nowhere to hide. Any noise is major... but the benefits of any reduction in ambient noise is more musical information is uncovered... ambience from the music is greatly increased.
Finished room A completely separate 70 amp, 220 volt electrical service was run to the room with its own dedicated panel. This is taken from the home electrical panel in the garage, just after the meter. It is upstream of any other panel. In the future I may attempt to have a totally separate electrical service and transformer from the street for the room panel, but I didn't want to tackle the politics of that at this time. All the motors and such for the house are on their own separate sub-panel, and when these motors cycle on I get no noise of any kind through the room-dedicated panel. A 'home run' goes from the meter to the dedicated panel outside my room in the hallway. There is no main breaker in the dedicated panel, and it is the highest quality panel I could find. This panel has its own quite robust dual grounding rods. There are 11 dedicated circuits for the room, all with 'home runs' of 10 gauge Romex run to JENA Labs 'deep-immersion cryo'ed' duplex outlets... all grounded and run with the same phase. I have installed the wall panel in such a way as to allow for easy installation of an EQUI=TECH 10kv Wall Cabinet System in the future. Rives Audio recommends this approach since it allows for up to a 12dB reduction in noise. This is what Chris Huston specifies for the Pro Audio studios he designs. For now, the budget won't allow it. The electrical service to the barn, with all lights, 'dirty' outlets, and HVAC, is completely separate from the dedicated panel. The lighting system for the room consists of four separate lighting 'zones': one for the media shelves (seven recessed cans), one for the side diffuser panels and source shelves (two recessed cans on each side), one for the track lighting just above and behind my listening position (three halogen spots on each side), and one for the front of the room above the speakers and front diffuser panel (seven recessed cans). I aim two of the track spotlights directly over my shoulder at the listening position to give me great reading light with no shadows. One track spot is aimed at the turntable position, and the others bring more light to the upper media shelves for an easy selection of recordings.
Media shelves show lighting These four zones are tied together with a Lutron GRAFIC EYE 2404 dimmer control. This allows for four scenes, and all off and all on, as well as any position in between. It is a totally quiet, very simple to use control that is programmed into my Philips Pronto remote. I can dim each zone separately on four different 'scenes' to get just the right amount of light for every situation. It transitions between scenes very smoothly. To me, getting the lighting correct is one of those 'fine details' that can make the enjoyment of the system much better. Typically, the front lighting zone is always off unless I am doing cleaning or setup of some sort. In fact, for serious listening I typically have all the lights off except two 15 watt 'loose' cans that I put on the floor aimed up at the ceiling directly behind the speakers. These 'up-firing' lights cast a warm glow over the front diffuser panel and ceiling and really enhance the whole musical experience. I considered the issue of acoustical problems resulting from all these recessed cans and track lighting. I was concerned that the ceiling bass traps might cause resonance with the metal cases of the cans. I had quite a bit of lead tape applied to these cans before the ceiling was buttoned up to insure it would not become a problem. Once my system was in the room, the first thing I did was to play a bass 'boom' track over and over and search for any resonance. I found three of the cans did have slight ringing from the trim, and secured them. I went around and put my ear close to each light. In the near future I'll get a more sophisticated low frequency sweep, to ensure I have found all possible sources of unwanted resonance. I anticipate having multi-channel hi-rez music in the future. To that end I have installed 2" conduit in the concrete floor for future runs of interconnect or speaker cable. There are runs to each rear corner, the front center, and front side... and all these runs meet at a box behind the side gear rack. Also, I prefer my digital transport near my listening position, so I have another conduit run to a box behind my listening position, which allows the ST optical cable that connects my transport to my DAC to run under the floor. This box also has one of the dedicated circuits included, which runs in its own separate conduit from the dedicated panel under the concrete floor. Regarding hi-rez multi-channel acoustics, it will be slightly compromised, as the ideal rear speaker setup is at 110 degrees to the listener. In my room it will end up being about 130 degrees. To get 110 degrees would have required a much wider room and would have compromised the ideal 2-channel acoustics... so the priorities were clear for me. On the plus side, all the speakers will be equidistant from the listening position. I may end up with a 'phantom' center channel, as I have my reservations regarding the true benefits of center channel speakers for music only. My best multi-channel music experiences have been quad so far. I do have a separate home theatre in my main house, and don't ever anticipate having film/video in this room (although it is wired for a front projector and motorized screen). The Construction process I have known my contractor for over 20 years, and done maybe 20 work-related projects with him and his crew. That said, it was a challenge to control the budget and the work pace with so many unusual aspects to building a listening room. The results have been worth the effort and expense... but there were times when it was hard to see the finish. All the acoustical treatments required a big learning curve for my contractor. In the beginning there were many phone calls between my contractor and Rives Audio (both Chris and Richard). I was pleased with the level of communication that went on. On the other hand, I also checked every single measurement and construction detail for myself. I knew if I wanted to hold Rives accountable for the final performance, then I would need to make sure that the plans were meticulously followed. As with any other construction project I have been involved with; there were a few places where the construction drawings could have had more detail. Possibly from the perspective of the designer they were perfect... but there were areas that were somewhat difficult to figure out. Over time, as Rives educated my contractor; everything was figured out and things were put together correctly. Once the contractor was clear on the 'what' and even more importantly the 'why' of things... the contractor was able to find the most efficient way of doing things. This is a normal process with any/all construction projects. Even if the drawings were not perfect (they never are) the communication was. Richard and Chris were always available to answer any questions or discuss any issue no matter when or how long it took. Many of the methods of solving problems were a result of great input from Rives to my contractor. Any project like this will require tons of time between the contractor and designer. Rives was able to suggest sources for acoustical materials and different possible approaches for constructing the diffuser panels. My contractor was never 'on his own' and felt very comfortable working with Rives.” It did all work; and my contractor did a great job of figuring out how best to put things together. There were a few different challenges… There are lots of fabric wall panels... my contractor became an expert at building them. Integrating the windows into the angled front bass trap was a real challenge. You have a window on the true outer wall and an angled fabric wall inside it. The contractor disconnected the inner frame from the window and built a larger window frame with the same angle... it turned out great. There was a real learning curve to get the ceiling to come together and work properly. The construction drawings were lacking enough detail to get the whole picture. It took many calls and discussions to nail it down. Again, the contractor had to understand why things were being done before he could get it done. The diffuser panels were a challenge for the cabinet maker... and took much longer to build than he anticipated. At the two month point, Chris Huston visited the project. Chris lives in Nashville, so he flew out for an overnight visit to consult with the contractor and make sure everything was progressing properly, measure the distances to ensure no problem there, and answer my questions. It was great having Chris really explain concepts to the contractor, and get everyone on the same page. Chris was very impressed by what he saw and excited about the potential of the room. Spending time with Chris was a treat for me... we played a bunch of LP's that Chris had engineered, and I loved his stories about all the 60's music scene. He gave me much deeper insights into real world acoustics than I had previously understood. After Chris's visit in early July, it was mostly a matter of just getting the work done. This project was more than just a listening room. We were basically finishing an 1800 sq. ft. house. There were nine windows, five doors, floor coverings, finishing the upstairs hayloft, etc. etc. There were many delays. Suffice it to say that anything that could take longer did... about three times longer. Windows, doors, cabinets... they all took forever. I have no patience to begin with... and this was torture for me. As July turned into August... into September... I was pretty frustrated. Some of the delays were controllable, but many were not. The building trades move at their own pace. I had been through this before many times at work... but had avoided remodeling at home. The one saving grace was that at least they were not working inside our home... it was 50 feet away. Finally, in early October, it was far enough along I was able to move most of my gear into the room. The side diffusers, ceiling diffuser panels and front fabric walls were not complete, but there would be no more staining or sanding done in the room. It was educational to hear what changes were caused by the different acoustical elements as they were added. I had contacted Rives prior to move-in regarding speaker and listening seat locations. After doing the math, they came up with 9' 6" tweeter to wall behind the speakers, the speakers 9'4" apart, and my listening chair 9' 8" from the rear wall. After a couple of weeks of experimentation and completion of the last element of acoustics, I ended up fairly close to Rives original positions. The speakers are 10' 2" tweeter to tweeter, they are 9' 4" from the front wall, and my listening position is 10' 2" from the rear wall. I am sitting in a near-field ratio... as my ears are 10' 7" from the tweeters (103% of the speaker width of 10' 2"). The last big issue was installing my turntable... which waited until all else was done. I finally reached the end of my 18 month process of building a new room.
Front of room Was it worth it? Yes. The room is a wonder. It is hard to be objective about one's own room. From feedback I keep getting, my feeling is that there is agreement that the room is about perfect... but that everyone thinks I should get this piece of gear or that... make this change or that change. I have realized that the room does have one big problem... there is no place to hide. Any flaw in recording, recording format, performance, speakers, amps, whatever... that imperfection is exposed for anyone to easily hear. I am going slowly at this point. For one thing, my budget is blown. But also, it is time to just listen to music and enjoy... to have friends over to share, and just get myself back into a normal audio groove. There is no hurry to change anything. Richard Bird did visit in early November to measure the room. I had already been satisfied with the way it sounded... and had already determined that I wasn't going to get caught up in frustrations about perfection. And yet, I wanted the room to measure as perfectly as possible. Richard was as taken by room as others have been... then he got out his tools and went to work. Overall, the room measured very well... in fact, Richard commented that above 134 Hz it was the flattest room he had ever measured. No room is flat; all rooms have nodes, nulls and peaks. In any approximately rectangle room the listener will be located along the center line of the long axis (for soundstaging purposes). Along this axis at any particular point, there will be a null frequency and a peak frequency in the bass. The only way to completely avoid this is to flair the room 30 degrees or more… which then creates other acoustical problems more severe than these nulls and peaks. The challenge is to minimize the nulls and peaks... to make them very mild. In my case I have about a 5dB to 6dB peak at 134Hz, and a 5dB to 6dB null at 80Hz. Otherwise the room is pretty flat up and down the whole audio range. If you go halfway between the listening position and the sidewall, the null flattens and the peak flattens. These are room issues and not speaker issues. To my ears these are very mild problems. There are potential cures, but I'm not sure I will EVER pursue them. From time to time I do perceive a slight wooliness to the mid-bass... but only occasionally (a very few cuts of female vocal, or maybe a cello recording). If I focus on what is not perfect I can detect it... but that is not my way. The other issue is that my speakers do not go as low in the bass in this room. My previous room was about 1/3rd the interior volume of this room, and my speakers extended to around 25Hz, pretty flat. In this much larger room they only go into the mid-30Hz range (the rear ports just can't pressurize this room to the same degree). It is not a big deal to me, as the bass is, by far, the best, most articulate bass I have ever heard. I wouldn't trade the articulation I am now hearing for all the deep bass in the world. I may pursue remedies in this area... but later, not now. This was the extent of the 'bad news.' Richard measured all around the room for frequency consistency... and it is amazingly flat wherever. There is not a bad seat in the house. How do I like it? I'll finish by saying that I have never been much of a classical music listener, and almost never to full orchestral works. Why? Because they almost always sound like crap, or at best not very good... no matter what gear or room I've heard them in. Not any more. It doesn't matter what you play... this room/system will portray it in its full glory. You want size, scale, dynamics... it will deliver. Without a trace of strain or fatigue. Each musical element is fully rendered and complete. You hear musical elements on very familiar discs that you have never before heard... and they are fully realized. I have not found ANY full orchestral recording that this room/system doesn't absolutely NAIL. A conductor friend (who is also an audiophile) brought over a few of his own recordings to listen to... now here is someone with a correct reference. After an hour or so and three or four of his recordings, he turned to me and said, “Yes, that is the way it was." That's good enough for me. As time goes by and I discover more room truths, I will try to share them with you as articulately as I can... but it is now time to listen.
|