|
You are reading the older HTML site Positive Feedback ISSUE march/april 2007
PFO
DIY - The Marantz CD16: A Strong
Upgrade
[Fabio Camorani is an audio designer and modifier based in Italy, DBA AudioNemesis. He can be found over at Audionautes: http://www.audionautes.com. As always with a DIY project, PROCEED AT YOUR OWN RISK! Remember that potentially lethal charges are involved with any audio component, and that errors can lead to damage or loss of a device. DIY modifications also void manufacturers' warranties, of course. PFO assumes no liability or responsibility and makes no guarantee or warranty, express or implied, regarding the suitability/results of modification projects. You have been warned, good reader. - Ye Olde Editor] I think that very good but old CD players can be improved a lot. I also think that today there are only a few very good CD players on the market. Try to see what manufacturers offered 10-15 years ago and what they offer now. You will see that 10-15 years old top quality CD players had a top quality construction. Now a poor construction is very common. We know that all chips are faster and better, but transports are usually poorer and very poor in absolute: the same for frames, power supplies, active (very common to find very old—and cheap—,OP amps) and passive parts etc. This doesn't mean that old CD players sounds better than recent ones, but I think that with a few mods they can outperform most of recent players at the same or even higher cost! With some well made modifications you can bring top quality old machines to a new life full of music. What I describe here can be done (in general) also in many other players or external D/A converters. All improvements follow my usual way of doing high quality audio systems for the right cost and my way of loving music and its reproduction. Feel free to try them and let me know, if you wish. Marantz CD16 I have several old players, I like to collect them to enjoy their construction, to enjoy and upgrade their sound. Above all Marantz CD16 and Marantz CD94. We will talk about CD94 the next time, now let's see what to do with CD16. CD16 was a very good player (the CD15 was even better and you can find it at a low cost in Japan). But if I listen to it now (in original condition) I see that it is pleasant and musical, but really dark, not clear. It seems to be rich, with many harmonics but these harmonics seem to be behind a big curtain. And it's slow, really too slow. This machine is really well built, with a very good transport, even if the servo chips are old and VRDS may be better (as is). There are a lot of things we can do for improving this player; among them, the use of a new external D/A converter. But not only this. So I will describe all the mods I made in my CD16 during the last 6 years, trying to explain how to do them and their results. They are not in order of importance/cost. Up-grade 1 The first thing I made was putting a new clock. This is a very well known up-grade, I suppose. There are several clock-generator manufacturers. Since I was the Italian distributor of the Danish L C Audio Technology (at that time) and since I think they offered the best generator (for that price), I used it. Model XO2 is the one you see in the picture (now they have the XO3 version, better but more delicate, not really universal in my experience), because that was the model when I made this upgrade.
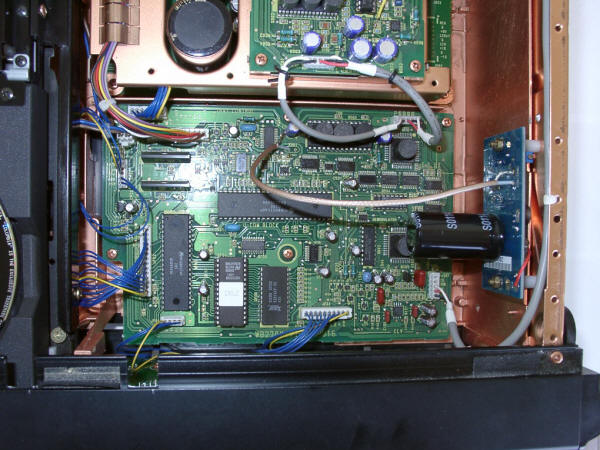
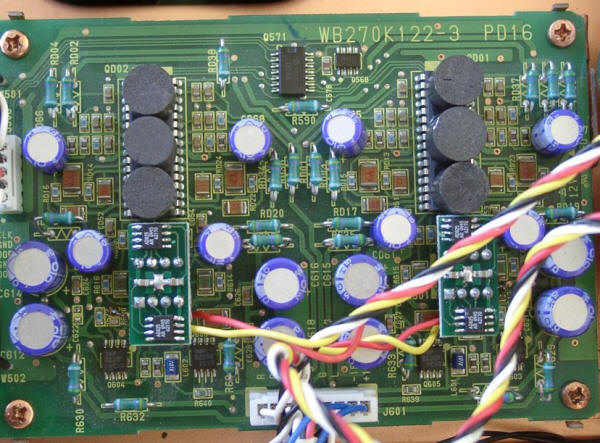
FIG.1 - L C Audio Technology clock (XO2 model) and its connection to the main board. You need a clock with 33,8688Mhz oscillation. The mod is very simple. The crystal X561 is on the PCB named PU16 (Control/Decoder) and it's near the chip Q564 (TC7WU04F). Remove the crystal, together with C564 and C563 (5pF each) and R562 (1Mohm): all these passive parts are surface mounted, so they are not very easy to remove without damaging the board. Oscillator OUT must be connected to the solder pad of the crystal connected to PIN 1 of Q564 (TC7WU04F). Then connect GND of the oscillator to the solder pad connected to ground of one of the two removed 5pF caps. Connect the oscillator power supply to the positive (+) pin of C854 (6800µF/35V); that is about +19V.
You can do the same upgrade with the very good and rather cheap Audio Tuning XO Clock3, a sort of "clone" of the mentioned old XO2 (and better than it). For the ones who don't know what happens when you change the main clock, I say that there is no change in tonal quality. This is important. What you hear is, above all, better bass and high frequency, with (much) more harmonics all over the audio range, improved soundstage. With lower jitter you will see that the sound is less hard and more "analog", so more natural and with thinner grain. It's a very important improvement. For the ones who still don't believe, I say only: please try it. This upgrade is strongly suggested, even if an external D/A converter is used. Up-grade 2 Another useful mod is changing diodes and capacitors. I think I have to say nothing special about it, because it's a very well know up-grade, very common. It's usually the very first upgrade done by DIYers. I don't like this kind of mod too much, probably because when I design a product I do a deep evaluation about passive parts, so I don't want customers to change them. So, during the past, I usually added 1uF to 4.7uF MKT caps in parallel with each main electrolytic capacitor. As discussed in my Kismet amp series [see https://positive-feedback.com/Issue1/kismet.htm), using small value poly-something caps in parallel with electrolytic caps is a sure way to have unbalanced sound. But if we do a strong parallel we can have good improvements. And I made this also in this CD16, adding 2.2uF and 4.7uF MKT for each main cap. But what can we do with small electrolytic caps? I never added anything to Black-Gate and Cerafine caps. They are not well balanced products (despite what I read everywhere), but they don't like bypass. One day I tried Sanyo Os-Con capacitors. I decided to use them, changing all small value electrolytic capacitors, with no bypass. (Well, there are minor surface mount technology (SMT) bypass on the board that I did not remove, but you can do it). And I changed the diodes. I see that it is rather common to use Schottky diodes instead of standard ones. I still prefer soft recovery type. You can choose among several manufacturers. IR offers high current versions, so you must find low current version elsewhere. In particular, I changed:
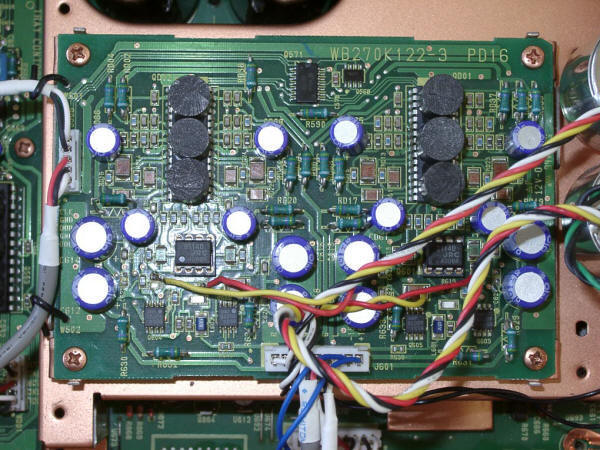
With this mod, you will have a clearer reproduction, with more details and harmonics. It's a richer sound, another curtain is cut, especially in bass and high frequency. Very simple, rather cheap, good result. In FIG.2 and FIG.3 you can see something about this.
FIG.2 - I changed some electrolytic capacitors with Os-Con (see also the High Density Graphite (HDG) blocks).
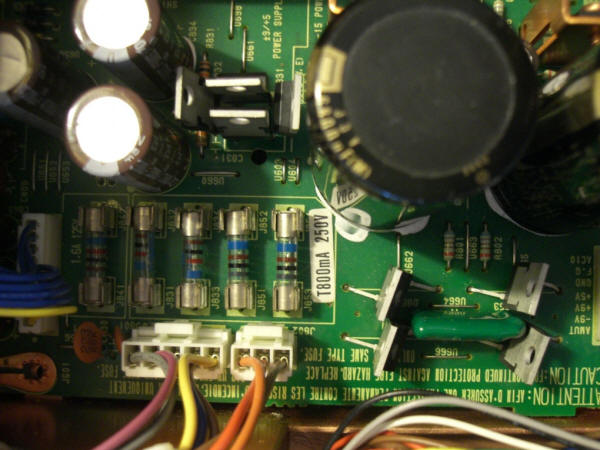
FIG.3 - The new diodes. You can do part of this upgrade also if you use an external D/A converter. Up-grade 3 This is an unusual up-grade, but it's very, very effective. More than 10 years ago I "discovered" Kiyoaki Imai San of Audio Tekne. I have met him many times since then, and now he is a friend. He did teach me a lot of things about audio, good sounding projects and, above all, what is a good sound. He showed me a strange material he named carbon block. He started using it for absorbing vibrations more than 20 years ago. In effect, he showed me a lot of times how "dangerous" are vibrations for a good sound, even in parts I never thought about. Then I tried to see all the effects of this strange material, that is a very special graphite, named High Density Graphite (HDG). I discovered how important is also in solid state designs and you can see that I use it in my AudioNemesis products. I put a lot of small HDG pieces on every audio chip inside the CD16. You can see the pieces on the DACs in FIG.4 (and FIG.2).
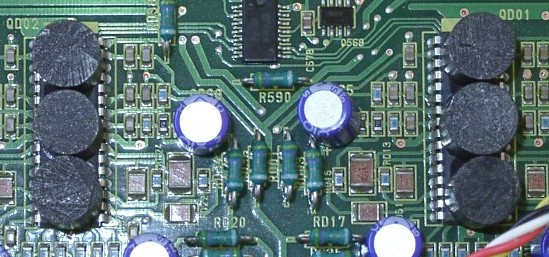
FIG.4 – A very unusual but very effective improvement: I put some small HDG pieces on the most important chips to minimize any vibration effects.
What happens? All parts may have problems with vibrations; silicon chips too. These small pieces help to absorb these vibrations. You'll hear a big difference (in my opinion), especially if you think there will be no difference at all. In particular, the pieces on DACs do the best job. They are the most critical HDGs. Richness and soundstage presence will be greatly improved.
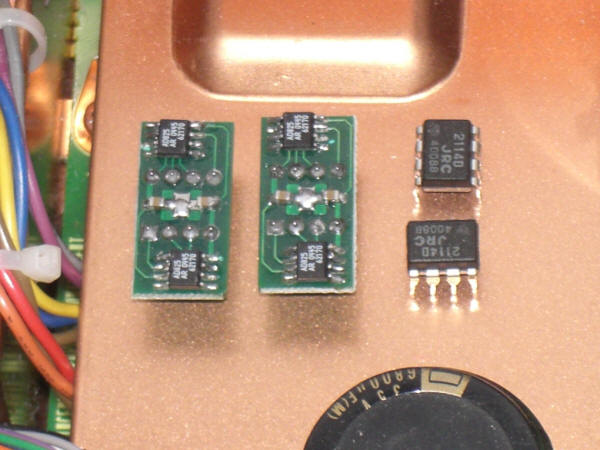
You can do part of this upgrade also if you use an external D/A converter. In particular, you can use it on Q563, Q561, Q501, Q571, QD01 and QD02. Don't "protect" DACs, of course, if you use the external converter. Use them also on OP amps, if you still use them (see below). Up-grade 4 The CD16 has several OP amps and a couple of HDAMs in the analogue output stage. The OP amps have a rather standard connection, while the HDAMs (discrete very simple OP amps) are there because they must give a particular sound. There is no need of these amps from the electrical point of view. The OP amps are in the small board with the DACs, and the HDAMs are in the main power PCB. I think that we can bypass the HDAMs without particular problems. So, you can take the signal before the HDAMs. But we can do more, because we can also see that we can use only the first OP amp (per channel), the dip one, bypassing all the others (SMT and HDAMs). We must use only what we need, as simple as possible but not simpler. So, we can use only the first OP amp. But we can do even more. We can also change the OP amps with a better model. Which model? There are many fast and good OP amps on the market, you can check catalogues from Analog Devices, Burr Brown/Texas, Linear Technology, for example. For sure you'll have a better sound using one OP amp of the latest generation. But again we can do more. I tried very high performance OPs but I found that I like the Analog Devices AD825. This is a very special OP amp, taken from the original PMI projects. (PMI was bought by Analog Devices many years ago.) It's a "low feedback" OP with a very wide open-loop bandwidth (so it has a very low—for an OP amp—open loop gain). So, in this OP the feedback is working well and the sound is different from other OPs. I don't like feedback at all. This must be clear. And I think that we can do without it in the audio field. But when we have OP amps and can't (do not want to) change the design, we can up-grade them. The AD825 is a superior design, but it is a surface mounting device and it's a single OP amp, so you need an adapter. Years ago there were one or two manufacturers of this adapter. Actually, I still offer in Italy some small modules named AN2002 for this purpose. If you are a good DIYer, you can try yourself. In conclusion, you can use only the first 2 OP amp, the ones named Q601-Q602 (NJM2114) and Q603-604 (NJM5534) and take the signal from the pin 6 of Q603 and 604, avoiding all other amps. And you can up-grade this amp using a few AD825 per channel. FIG.5 and FIG.6 show you part of the upgrade.
FIG.5 - The new modules in the DAC board.
FIG.6 - The new OP modules with the old OP Amps. AD825 has a different sound if you compare it with standard good quality OP amps. It is similar to discrete topologies. The improvement is great, all over the audio band and parameters. There's more music, nothing else. Up-grade 5 When the CD16 (and CD15) were produced, Imai San immediately made a few upgrades for them. The most important one is a pair of Super-Permalloy transformers. Well, this is a very special up-grade made just for TDA1547 D/A converter. And I used it also for some Teac CD player models. Many years ago, Audio Tekne discovered that one of the best upgrades (especially for CD players) is using an interface transformer. So Imai San designed this special transformer with a ratio of 2:1 (the impedance is of course 4:1), and put it on the market as interface/adapter device. It was an external unit, and today more than one model is available from the Audio Tekne catalogue. I verified for myself how good the idea is, and then put my own version on the market. You get very good results, with wider soundstage, more harmonics, a more natural (and analogue-like) sound, with more detail. But in some specific applications this transformer can be put inside the CD player. Audio Tekne designed a special version of this interface transformer for the TDA1547. Still with a 2:1 ratio, it must be connected after the first OP amp, then direct to the output RCA. See FIG.7 and FIG.8.
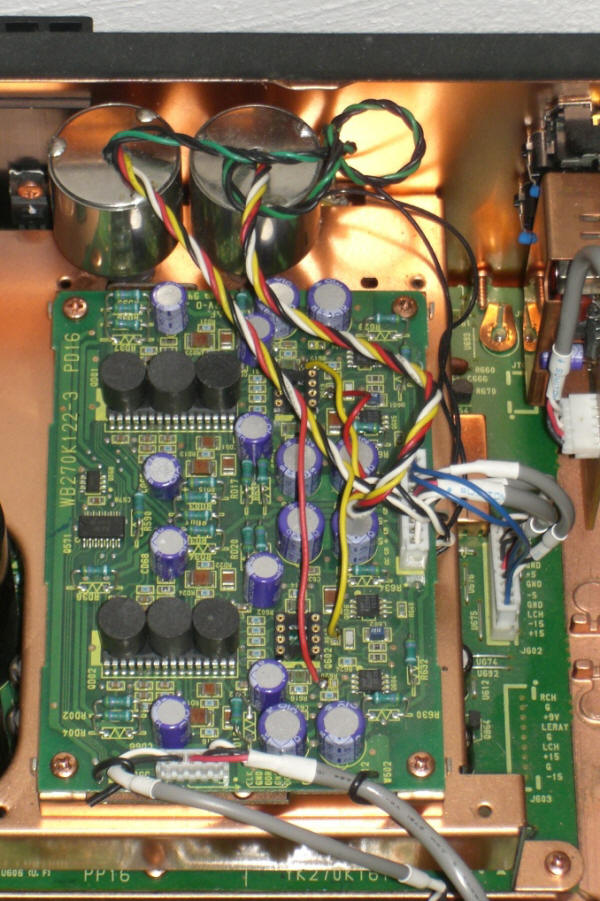
FIG.7 - The interface transformers made in super-permalloy by Audio Tekne just for the TDA1547. Amazing!
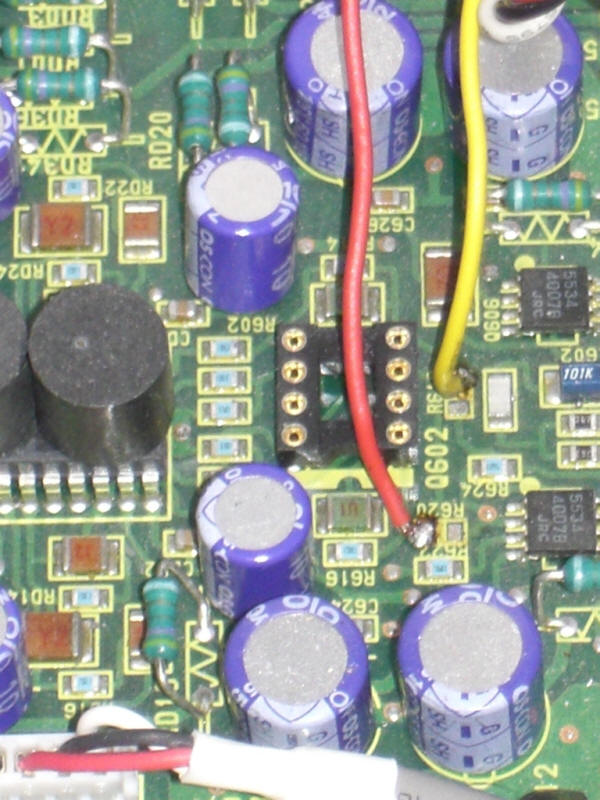
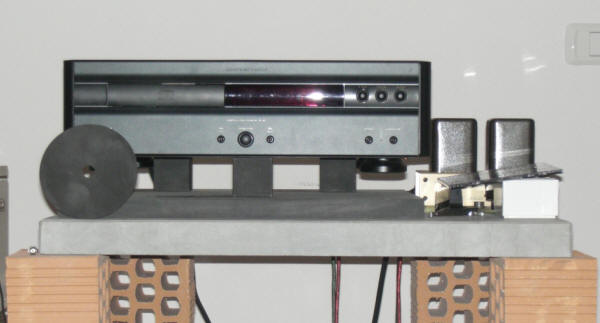
FIG.8 - A detail of the connection of one channel. You must remove R617-619 (and R618 and 620 for the other channel), isolating the first two OP amps form the rest. Then connect the yellow wire to PIN7 and the red wire to PIN1. Connect white wire to black wire, and connect the green wire to the hot output of RCA and the black wire to GND. Better, with the Audio Tekne transformer, if you use a 0,01uF cap between the output pins (RCA), but you can tune it down to 2400pF. Ratio is 4:1; that's all. In other words, the primary winding is center tapped with the white wire. Yellow and red wires are the primary connections. Green and black are the output connections. You can't believe the result without testing it. Of course, even if with a lower effect, we can do the same using other transformers. Please try this upgrade. You'll be impressed. Now the sound is really sweet and detailed, with more dynamics. You will never go back! You can also use an external interface transformer, and I suggest you this upgrade for 99% of CD players. Up-grade 6 I built a lot of accessories in HDG, as suggested by Imai San. So I suggest you use a CD stabilizer. It perfectly works in Philips transports, usually also in many Sony models. It can't be used in VRDS and Pioneer Stable Platter transports, though. And you can also use 3 HDG blocks under the player. 50x50x25mm are OK, even if 50x50x50mm are better. Even better than that is 100x100x50mm. In FIG.9 you can see the CD16 with its supports (50x50x50mm) and the CD stabilizer. Please notice the super HDG big base.
FIG.9 - The CD16 with 3 HDG supports and the CD stabilizer I use and suggest. Conclusions With these mods you can really improve your old CD16, bringing it to new life. The sound will be amazing, bringing you nearer to the music. You'll have a lot of fun, too! And you can do all the mods one by one. Of course, you can do most of them in players different from the CD16, as well as in external D/A converters. I encourage it—please try. If you have any questions, please contact me at [email protected]. Thanks Many thanks to Kiyoaki Imai of Audio Tekne: http://www.audiotekne.com.
|