
POSITIVE FEEDBACK
ONLINE - ISSUE 1

|
POSITIVE FEEDBACK
ONLINE - ISSUE 1 |
marigo audio labs VTS Tuning Dots as reviewed by Dave Clark and Francisco Duran
|
||
|
|
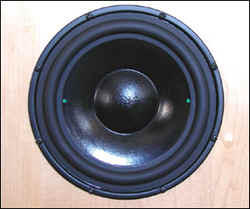
There are two things to get out of the way. First, the VTS Dots should not be considered a tweak, though no doubt many people will take them as such. To quote Ron Hedrich, designer of the Dots, from a conversation we had about this, "What is a tweak? Is a missing technology that can be permanently incorporated into a system—one that yields across-the-board sonic improvements, in all parameters, in all systems, regardless of performance level—really a tweak?" Second, Marigo Audio Lab and its Dots have been around for quite a while, so even if you consider them a tweak, they aren’t a tweak of the week. Marigo was established by Hedrich back in 1989 to design and manufacture custom audio components. He has combined a love of music and over thirty years of experience as an audiophile with a rigorous technical background in physics and aerospace engineering to create a line of cables and resonance-control products. The Dots may not look like much, but there is some serious effort and science behind what they do. What you get is a package of green, white, brown, or black dots that vary from silver-dollar size to ones that will fit on the head of a pin. Different colors and sizes reflect different applications. Bigger Dots go on bigger things and smaller Dots go on smaller things. All are backed with an adhesive to hold them in place. The first task was to treat the baskets on the four woofers and two midrange drivers in each speaker. Carol and I applied twenty Dots per woofer and ten per midrange, totaling 180 Dots altogether! After marriage counseling half way through this ordeal, bass clarity and definition were readily apparent. The Dots allow stored energy in the basket to be released, resulting a more pistonic-like action by the drivers. Less wasted energy translates into less distortion and better music. Next up were the bags of 3mm Green VTS Tuning Dots ($69 for a set of 24) for the woofer and midrange speaker cones. These are applied just inside the surrounds. The idea is to add one Dot at a time till the life is literally removed from the music, then go one Dot back and you have the magic number. It won’t take many Dots to get to that point, and the instructions are very clear as to where to start. Results will vary from speaker to speaker, or even driver to driver, so it cannot be readily predicted what will work. I ended up with four on the external woofers, two on the internal woofers, and one on each midrange driver. On the woofers they were arranged at the 12, 3, 6, and 9 o’clock positions. When I installed the JPS Kaptovator power cords on the Clayton amps, however, this was too much of a good thing, so I am now using only two Dots, at 3 and 9 o’clock, on the external woofers. This offered a better musical balance. The other drivers stayed the same. With four Dots, the bass was too lean and analytical, and it lacked warmth. Going to two brought up the warmth factor while retaining the tighter, more defined bottom end. The improvements were not subtle. They brought great transparency without losing musicality. You could say that this is because the Morel woofers have flaws, but I would have to disagree. Each woofer retails for $108, and is as about as well-engineered as a woofer can be. The Dots are again, through constrained layered damping, removing resonances that are clouding the ability of the drivers to make music. Could Morel make drivers to solve this problem? No doubt yes, but at what cost? The Dots offer an easy solution, and one that allows the user to "tune" the system. On to the
tweeter flanges, I applied two of the 3mm White VTS Dots ($69 for a set of 24) per driver.
These helped to clean up the high end, allowing greater image specificity and an airier
top end. It was not as much of a revelation as the Dots on the bass and midrange drivers,
but still an I also used the 3mm White Dots on the digital chips and voltage regulators inside the transport and preamp, but at this point I was hearing such a fantastic transformation it was hard for me to put my finger on what the additional Dots were doing. Cleaner and more articulate, without doubt. Next I Dotted the tops of all the electrolytic capacitors in the transport and preamp with the 2mm Green Dots, as well as using two 2mm White VTS Dots ($69 for a set of 24) the Tungsram vacuum tubes in the preamp. Once again, a touch more clarity, presence, and naturalness was evident in the music, but again the improvements paled in comparison to those of the driver Dots. Consider Dotting at this level to be the icing on the cake. Last was the application of the 32mm Black VTS Tuning Dots ($79 for a set of 12) to the window behind the listening seat. This is a very large and thick arched picture widow measuring four feet by eight feet. The Dots were applied in groups of three, at the bottom corners, at the point where the arch begins (half way up both sides), and at the apex of the arch. Improvements in soundstage dimensionality and image clarity were readily apparent, as well as the removal of a slight harmonic smearing. This was not mind-blowing, but certainly audible. If you want to hear the best from your system, this is the last step. The VTS Dots bring greater clarity, dynamics, inner detail, midrange bloom, bass slam, and articulation, along with such an improved sense of openness that they represent a major paradigm shift in resonance control. Their use does not preclude the use of other resonance products (feet, cones, stands, etc.). It’s just that using the more conventional products is merely scratching the surface. You must treat the whole system, and in a more precise manner. There are several downsides to the Dots. One, most are small, and a pain to apply. Two, you need to buy a variety of Dots to do a job properly, and while they are not expensive individually, the price can add up quickly. Three, it does take a lot of time to try them here and there, finding out how many to use and where they work best. This is much easier when you have assistance. And finally, you will find yourself having to explain why there are Dots all over the place, but I can only say "Buy some now!" I did, and will never go back. A tweak? Well, they can make such a major improvement in a system that who cares what they are called? Dave Clark
|
|
|
|
VTS tuning dots come in a variety of sizes, thicknesses, and colors. The variations represent specific applications. Each dot is designed to dissipate vibration from components through constrained layer damping, and there seems to be no end to the number of places you can stick them in an audio system. There are dots for speaker cabinets (though I couldn’t bring myself to place them on the beautiful rosewood finish of my speakers!), circuit boards, vacuum tubes, integrated circuits, and so on. Marigo also sent along some VTS Dynamic Driver Bands, which are small green strips meant to be stuck around driver baskets. Marigo even makes large dots to tame unruly vibrations in windows. Marigo sent some pretty good instructions with these products. There were diagrams for placement of the dots everywhere you could think to place them and then some. They were relatively easy to install. I even stuck some on hard-to-get-to capacitors with my pocketknife and an old pair of tweezers. The baskets of my drivers are either coated with some sort of plastic or actually made of plastic. Wrapping the bands around the baskets proved fruitless because they didn’t stick, so I didn’t listen to that tweak. Sticking the dots on the drivers proved to be pretty easy, though. After all my whining, did these things make my stereo sound better? Yes, they worked really well. Did they reveal details never before heard? No. The biggest and most consistent improvement that I heard was an overall shift in timbre. With the dots installed, vocal and instrumental timbres sounded more natural, less like I was playing CDs through my stereo and more like there were actually people singing or playing instruments. It wasn’t dramatic, and it still sounded like canned music, but I really liked what I heard. This is definitely the kind of change I want. I’m not so concerned with bringing out more detail. The added resolution often brings about unwanted brightness. I want more natural timbres and textures, which is why I have switched over to tube equipment recently. I’m tired of Hi Fi and trying to get the last drop of detail out of my discs. I want music! I tried the dots on my speaker drivers first. I wasn’t really sure how many to use, so I started with one on each mid/bass driver. It wasn’t until I got to three per driver that I heard a difference of the sort I mentioned above. This was worth my effort, so I kept going. The second place that I thought the dots would be beneficial was in the Audio Electronics CD-1 CD player that is on loan here from Victor Chavira. This is a nice-sounding player, but it can definitely stand some improvement, so one by one, in went the dots. I put them under tubes, on top of ICs, capacitors, even voltage regulators. I didn’t place a dot, listen, place another and listen again. I just placed them in batches and listened. The outcome? Great. The sound became airier and cleaner. Dynamics were less pinched, a characteristic that seemed to be inherent to this unit. There was also a slight improvement in bloom. My Canary CA-601Mk.II preamp wasn’t given as many dots as the CD player. I put some on the coupling caps, some on the circuit boards, and of course one under each of the three tubes. Oh yeah, I also put two somewhat larger black dots on the toroidal transformer. There was less smearing of transients and a slightly quieter background after the dots were installed. If you don’t like the idea of Teflon rings around your tubes, the Marigo dots are a great alternative. I really liked the Marigo dots. Inserting them in just three components in my system, I heard a very noticeable cleaning up of the sound. The biggest improvements were more natural timbres and an increase in dynamics. The VTS dots are really very inexpensive considering what they do, and (honestly!) they were not very hard to install. The fact that they come with a 30-day money back guarantee should also appeal to the skeptical. If a guy like me, who has a jaded opinion of tweaks, can use these little babies and come away smiling, there is definitely something positive going on. Francisco Duran
|
|
|
|
VTS Dots Marigo Audio Lab
|
 As a
long-term audiophile, I have gone through many amps, preamps, cables, speakers, and
whatnot in the quest to create as musical a system as my pocketbook allows. If you are
reading this, no doubt you are in the same boat, though of course, what floats my boat may
not float yours. Recently I have been on the pursuit of "opening up" the sound
here. I have come to realize that while our system synergy is about as good as it’s
going to get, things could be a bit better. Call it audio nervosa if you will, but I am
always tinkering, much to Carol’s concern. After a listening session I can frequently
be heard saying "God, this sounds really good! But what if I changed this, that, or
the other?" Carol will then look at me with that expression, "Can’t you
just leave it alone?" or "What are you going to do this time?!" That’s
me, never satisfied. Where has this led me? To Marigo’s VTS Dots, which have been one
of the most effective and dramatic steps I have taken to improve my system’s
performance. I know that I am coming across like a lunatic reviewer who has stumbled onto
another "tweak of the week," but I swear, these little dots really work.
As a
long-term audiophile, I have gone through many amps, preamps, cables, speakers, and
whatnot in the quest to create as musical a system as my pocketbook allows. If you are
reading this, no doubt you are in the same boat, though of course, what floats my boat may
not float yours. Recently I have been on the pursuit of "opening up" the sound
here. I have come to realize that while our system synergy is about as good as it’s
going to get, things could be a bit better. Call it audio nervosa if you will, but I am
always tinkering, much to Carol’s concern. After a listening session I can frequently
be heard saying "God, this sounds really good! But what if I changed this, that, or
the other?" Carol will then look at me with that expression, "Can’t you
just leave it alone?" or "What are you going to do this time?!" That’s
me, never satisfied. Where has this led me? To Marigo’s VTS Dots, which have been one
of the most effective and dramatic steps I have taken to improve my system’s
performance. I know that I am coming across like a lunatic reviewer who has stumbled onto
another "tweak of the week," but I swear, these little dots really work.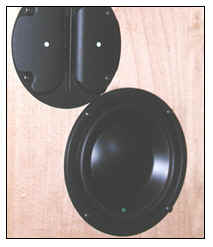 improvement. On the whole, in fact, using the Dots on my speakers wrought a greater
improvement than any cable or component swap I’ve made in recent years.
improvement. On the whole, in fact, using the Dots on my speakers wrought a greater
improvement than any cable or component swap I’ve made in recent years. I’ve
complained about reviewing tweaks before, so I won’t whine now, but when Dave Clark
sent me Marigo’s VTS tuning dots I thought for sure that he’d gone over the
edge! (No, wait a minute, the Prism tape was over the edge.) “I’m supposed to do
what”? I told Dave on the phone. “Take my equipment and speakers apart and stick
dots all over the place?” Actually, it turned out not to be as hard as it sounded. If
you have tube gear, you’re always taking the lid off, pulling tubes in and out or
adjusting something, so what’s the big deal?
I’ve
complained about reviewing tweaks before, so I won’t whine now, but when Dave Clark
sent me Marigo’s VTS tuning dots I thought for sure that he’d gone over the
edge! (No, wait a minute, the Prism tape was over the edge.) “I’m supposed to do
what”? I told Dave on the phone. “Take my equipment and speakers apart and stick
dots all over the place?” Actually, it turned out not to be as hard as it sounded. If
you have tube gear, you’re always taking the lid off, pulling tubes in and out or
adjusting something, so what’s the big deal?